~
Thursday, December 30, 2010
FIRE BY ICE
This is one of those ideas that is brilliant in its simplicity and utility. I had never considered using ice as a magnifying lens.
Thursday, December 23, 2010
PRODUCT REVIEW: MOSKITO TRAVELLER

After reading many articles by seasoned backpackers, singing the praises of ultra-lightweight camping, I decided to purchase a hammock. I pored over various products and eventually decided on the Moskito Traveller by Byer of Maine. This hammock was light, cheap and best of all, came equipped with bug netting to keep those biting critters out. I was extremely excited about using a hammock/tarp setup, and performed a successful test run in the backyard. In August, I finally had the occasion to test the setup under actual primitive camping conditions. What follows is my resultant review.
ERGONOMICS:
At a mere 11 ounces, the Moskito Traveller is certainly light. The parachute nylon feels thin, but relatively durable. It's surprisingly comfortable to lay in, if one can overcome the awkwardness of climbing in and laying diagonally ("Brazilian style"). The attached mosquito netting is suspended overhead by two points, and generally doesn't touch the sleeper or otherwise interfere when laying down. I imagine that this is about as comfortable as a lightweight hammock can be, due to limitations on size, weight and materials.
FUNCTION:
This is where the rubber meets the road, and when it comes to practical utility, I found the Moskito Traveller to be lacking. The ends are supported by a multi-cord system which seems inherently prone to tangles and irritation. With a little patience, it is fairly easy to untangle the twists and knots, but this still makes for an unnecessary hassle. The hammock doesn't include any straps for attaching to trees, but those are easy enough to come by. The Moskito Traveller was generally easy to get in and out of, but every now and then it would slip and jerk, making entry/exit a potential problem. The bag which contains the hammock is a fixed component, and doubles as a small bedside container when the hammock is set up. This is a useful feature, and also ensures that the bag is never lost.
The biggest reason for my purchase of this particular hammock was for protection against biting insects, namely mosquitoes. The netting, while intact, did serve its purpose. The problem I found, however, was that the bugs would simply congregate on the underside of the hammock, where they could easily bite through the parachute nylon. That was a major annoyance, as I was continually devoured throughout the night. This could probably be rectified with some sort of sleeping pad or extra blanket, but then the user is adding weight which begins to defeat the purpose of ultra-lightweight camping gear. I'm also not sure how easily a sleeping pad could be incorporated--I had a difficult time maneuvering inside the hammock with just one light blanket.
DURABILITY:
In this category the Moskito Traveller also suffers. The manufacturer's max capacity is rated at 250 lbs. That seems about right, though I wouldn't care to push it. The parachute nylon is exceedingly thin, and the support felt tenuous even at my weight of 165 lbs. Included is a length of shock cord which is used to hold the mosquito net elevated. It feels cheap, but serves its purpose.
I mentioned above that the hammock is relatively stable, but sometimes "slips and jerks" when one is getting in. At one point in the night, I had left to heed the call of nature. When I was climbing back into the hammock (carefully, mind you), it shifted suddenly, pulling on the shockcord and ripping a four-inch hole in the fragile mosquito netting. Well, it was bad enough when the bugs were voraciously biting me through the nylon bottom; now they were swarming in through the hole. I'm a lightweight 5'11" who is exceedingly careful with his gear. This hammock couldn't make it through the first night. How long would it last with anyone heavier or clumsier?
PROS:
- Extremely lightweight
- Easy to pack, unpack
- Self-contained bag
- Low cost
CONS:
- Will not, by itself, keep bugs away
- Prone to tangles
- Cheap materials/construction
- Arguably too fragile for the trail
BOTTOM LINE:
This product does not serve its function satisfactorily. The price (generally around $40.00) is attractive, but if you plan on using it in buggy areas, be prepared for modifications or sleepless nights. If bugs are not a problem in your area, this hammock might be okay as an ultralight alternative to a tent. Regardless of price, I expect a product to perform to its stated purpose for a reasonable period of time. Any product that cannot withstand one night of modest, cautious use, is a product that I cannot endorse.
GRADE:
69/100 - D+

(This photo depicts the first "test" setup in the backyard. Note that when the hammock was actually used, care was taken to level the supporting ropes and to allow the hammock to hang appropriately, per the manufacturer's guidelines.)
~
Thursday, August 12, 2010
A TRIP TO THE WETLANDS
Testing out my new Olympus Evolt E-510 SLR camera at the local beaver hangout, just before sunset. Unfortunately, the beavers did not appear to be home.
Juvenile Teal Duck:

Great Blue Heron:


Female Mallard Duck:

I'm still getting used to all the various settings in manual mode, but so far I am very happy with the photos.
~
Juvenile Teal Duck:

Great Blue Heron:


Female Mallard Duck:

I'm still getting used to all the various settings in manual mode, but so far I am very happy with the photos.
~
ARROYO SECO
What follows are some pictures from my recent trip to Arroyo Seco, California. This style of camping is what I would call "luxury primitive," meaning that I slept in a sleeping bag inside of a tent (and there were latrines nearby). No pad or pillow, but that didn't get in the way of a couple good nights of sleep. My brother and I spent the days exploring, snapping pictures, and fishing. The evenings consisted of gathering firewood, cooking dinner, and relaxing with cold beer in hand. We roasted our corn in the shuck, directly over the flames, allowing the outside to blacken. When it was thoroughly singed, we moved the ears into indirect heat and left on for about 45 minutes. We both agreed that it was the most phenomenal corn we'd ever tasted. Butter and salt/pepper seemed only to tame the corn's already perfect flavor. In conjunction with a ground beef/baked beans combo and perfectly grilled hotdogs, camp dinner turned out to be one of the highlights of the trip. We were skunked at the nearby fishing lake, but it was a pleasure just to enjoy the beautiful scenery. These photos were taken with my little Panasonic Lumix DMC-15 point-and-shoot:


~
Thursday, July 1, 2010
PRODUCT REVIEW: GERBER SUSPENSION
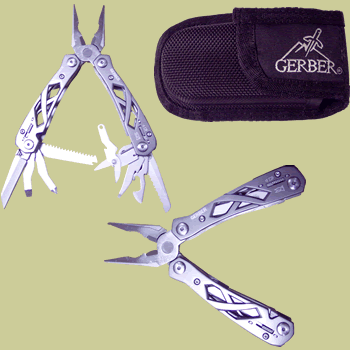
Of all my various tools and equipment, the item which sees the most frequent daily use is my venerable multi-tool, the Gerber Suspension.
ERGONOMICS:
This tool weighs a fairly hefty 8.8 ounces and its presence can be felt in a pant pocket without being cumbersome to the wearer. The Suspension comes with a black nylon belt pouch for carry, but I prefer not to use it. This tool has a heavily stylized look to it, with cutaways which give a glimpse at the implements inside. The contours make gripping the tool relatively comfortable and the cutaways lend a small amount of hold to a tool that lacks any real texture.
FUNCTION:
The Gerber Suspension features a total of twelve tools: Needle-nose pliers, round pliers, wire cutters, fine edge knife, medium flathead screwdriver, "flattened" phillips screwdriver, saw, serrated knife, bottle/can opener, small flathead screwdriver, and scissors. There is also a folding lanyard ring. Every folding tool locks firmly, using Gerber's neat Saf.T.Plus system. To release the lock, the user simply slides the notched bars on each side of the tool with a thumb and forefinger, then collapses the implement back into the frame. There are also helpful icons etched next to the lock release that illustrate which tool is hidden on which side.
The Suspension's pliers can be opened with one hand, as can both knives via incorporated thumb studs. Be warned, however, that it takes some force to flick the pliers open this way, and the user is likely to get a strong rap on the knuckles. Gerber has smartly placed a small amount of rubber lining on the inside frame, which prevents metal impact when closing the pliers.
Only two of the Suspension's implements are of questionable utility: the phillips screwdriver and the saw. Gerber has used a flattened design on the screwdriver, with a heavy tapering of the cross-pattern. This design gives very poor grip and encourages stripping of the screw head. I stopped using this implement altogether. The saw is also questionable because of its short length (less than two inches). While the aggressive teeth do an excellent job of cutting, the length severely limits this tool's usefulness. The small-diameter branches which the saw is capable of cutting will likely be quicker and easier to sever with a knife. The saw teeth are also prone to clogging and difficult to clean well. The substitution of a file would have made more sense.
DURABILITY:
Every implement opened with ease right out of the package, and has continued to function flawlessly over the two years that I've owned this tool. I have only oiled the "joints" once. Some of the implements have begun to form a tiny amount of surface rust which rubs off with a finger, but overall this tool has held up very well. The locking mechanism is as strong now as it was when new. The outside frame and markings appear untouched, despite heavy use. The knives on my tool are a bit scratched up, but the cosmetic damage has not minimized their utility. The blades hold a decent edge, but definitely require routine sharpening with daily use, particularly if cutting a lot of paper, cardboard, tape, etc. The scissor design uses a pin for tension (rather than a spring) and still works like new.
I've read other reviews complaining about plier weakness, but mine have performed extremely well. I've even utilized the pliers in situations that were not really fit for such a tool (where breakage would be more likely), and they've served admirably. I can only conclude that those other reviewers either received a lemon, or were using the pliers in a manner inconsistent with their purpose.
PROS:
- Durability
- One-handed opening
- Respectable array of 12 implements
- Excellent locking system
- Price
CONS:
- Poor Phillips screwdriver design
- Saw blade is too short
- Lack of file
BOTTOM LINE:
This multi-tool can be had in the $20.00 range and, for the price, the Gerber Suspension cannot be bettered. It has a few design flaws, but features one-handed use, full locking implements, and great functionality.
GRADE:
93/100 - A


~
Friday, June 25, 2010
BUG: IT'S WHAT'S FOR DINNER

Although my experience is not far-ranging, I have sampled ants, larvae, mealworms, small moths, and random flying insects that have been unfortunate enough to find themselves in my drink. This year I hope to expand my palatal horizon by trying maggots and grasshoppers. I don't personally have a psychological aversion to eating bugs, and it seems like an act that any person truly interested in survival should acquaint himself with. In a real survival scenario, do you really want to add the incipient experience of bug-tasting to your list of struggles? The person already accustomed to this six-legged savory experience will be eager for a meal, without the unnecessary hesitation or anxiety.
What follows is a collection of links on finding, preparing, and consuming bugs. Enjoy!
Entomophagy - Wikipedia
Eating Bugs by Ron Hood
Eating Bugs for Survival
Eating Bugs! By Aletheia Price
Insects as Food?!? by Stephanie Bailey
Eating Bugs by Bryan Walsh
Iowa State University's Tasty Insect Recipes
For Most People, Eating Bugs is Only Natural
Eating Insects Kept Injured Climber Alive on Mountain
~
Thursday, June 24, 2010
TRAP: FIGURE-FOUR DEADFALL
The figure-four deadfall is a classic trap that is tried and proven. The concept is similar to that of the Paiute deadfall, but the figure-four has the advantage of using only sticks for the mechanism, and is arguably simpler to construct. Below is an excellent video showing how to construct and set-up the figure-four deadfall. Ron Hood also adds some useful tips to improve the design.
~
Wednesday, June 23, 2010
TRAP: STATIONARY BOW
The bow offers several useful options to the trap-maker, including the ability to kill medium-to-large prey without supervision in a survival situation, or to provide bolstering self-defense in a SHTF scenario. The following pictures and video illustrate a few general variations of the idea. When time allows, I'll be experimenting with some prototypes of my own. I'll be sure to divulge any successful results.


~
KNOT LESSON: LOBSTER BUOY HITCH
The lobster buoy hitch is a fast, secure knot that I find myself using in almost any instance where a rope must be fastened to a post, railing, tree branch, or ring. It works well as the "fixed end" of a rope, like a clothing line, where the opposite end is attached with a taut-line hitch, for adjusting tension. The lobster buoy hitch gets its name from the commercial fisherman who use it to tie off their pot strings and buoy markers. Though it first appears somewhat bulky and pretzelesque, this knot compacts well once tightened, and is very strong. Unfortunately, it can jam (especially with certain types of cordage), but in most cases is fairly easy to untie, even after bearing a heavy load. I also use my own "slip" variation, where the working end is formed into a bight before making the last pass through the hitch loop. The knot then remains secure under load, but can be released much faster by pulling the tail of the slip, which collapses the knot. I wouldn't recommend the slip variant for any critical load, but it works quite well for most applications. Here is the lobster buoy hitch:


The Rope People also provide a useful animation of this knot.
View it HERE.
~

KNOT LESSON: THE ZEPPELIN BEND
This week's knot is the Zeppelin Bend knot -- my favorite knot for tying together two ropes of similar diameter. This knot is easy to untie, is more secure under a load than the sheet bend, and is incredibly simple. There are multiple ways to tie the Zeppelin Bend. This video shows the method whereby the tyer starts with the ropes' working ends in his hand, parallel, with the ends flush:
There is another method of tying, which might help the beginner to visualize how the knot works, and further ensure success in tying the knot in the alternate manner shown above. This method starts with the ropes' working ends lying on the ground. You can survey the full instructions at Survival Topics. Here is a visual synopsis:

When the knot is dressed, the final product should be symmetrical and look like this:

The Zeppelin Bend is sometimes also referred to as Rosendahl's Bend, since it was the only knot Lt. Commander Charles Rosendahl would trust for the mooring of his zeppelin. In The Complete Book of Knots, Budworth notes that the Zeppelin Bend is "probably the best of a whole trustworthy family of symmetrical bends comprising two interlocked overhand knots. It works even in big stiff hawsers and cables and is suitable for everything from hobbies to heavy industrial use. [...] The knot does not have to be completely tightened before loading; it is secure even with daylight showing through it."
This knot should be in the permanent repertoire of all campers, climbers, boatsmen, and survivalists.
~
FIRESTARTING: THE BOW-DRILL METHOD
...using only what nature provides.
This is one of the better videos I've seen on the subject. Concise, accurate, and easy to follow. He makes it look so easy!
~
KNOT LESSON: THE MONKEY'S FIST
I'll be posting similar tutorials from time to time, as I find them. Everyone should know a few basic techniques (how to tie a rope to various objects, how to tie two ropes together, how to tie an adjustable/sliding knot, etc.), and various knots come in handy for a variety of reasons and in numerous situations, from survival to work to bedroom fun.
The Monkey's Fist is a specialist knot, used for adding weight to a rope. The knot can simply be tightened into a ball unto itself or a heavy object can be placed inside the knot before tightening. Traditionally, sailors used this technique to render rope suitable for heaving greater distances. The Monkey's Fist can also be employed as a weapon. This knot is fairly time-consuming, and may take a proficient tyer 15 minutes or more to finish (tightening the knot is the lengthy part). It is also possible to leave excess rope on the other side of the "fist," although the video does not illustrate this.
~
Subscribe to:
Posts (Atom)